Have you walked the plank? You will, with a roofing jack. It’s the safety precaution you will need when fixing or performing construction on a roof.
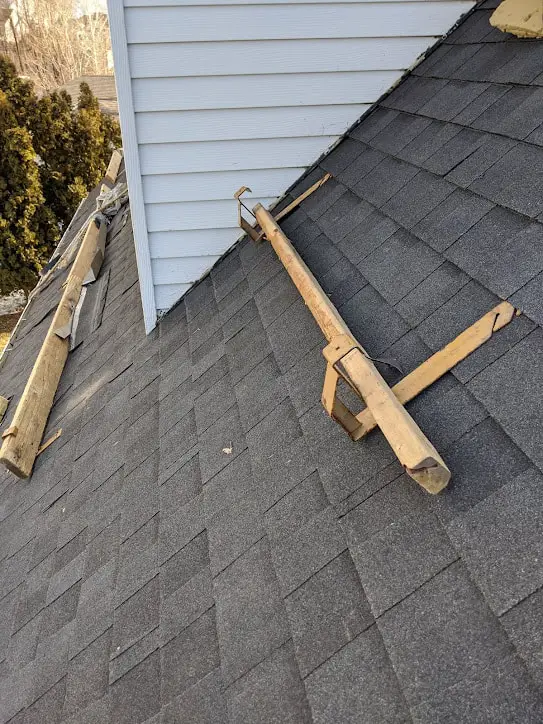
What is a roofing jack? A roofing jack is a metal device that holds wood planks or boards for you to step on during roofing construction. They are made of metal with one end containing hooks for attaching to nails and the other a J-shaped curve, which is used to hold wood. Typical board sizes placed on them are around 2 x 8 inches or 2 x 10 inches.
There are two kinds of roof jacks. The metal device that holds the platform pertains to safety roof jacks, while the other pertains to those preventing leaks in the house. In this article, we will be discussing the safety of roof jacks and how to install and remove them.
What is a Roof Jack Used For?
A roof jack is used to provide safety since working on a roof can be dangerous. To avoid slipping and accidents, roof jacks give a flat surface you can step onto, so you are more balanced as you work. This is especially helpful when working on roofs with steep slopes.
These roof jacks come in different types, depending on the degree of the slope of the roof you are working on. Their installation is generally the same and is done in simple steps. They are spaced equally across the working area, and after being secured in place, wooden planks solid and stable enough as a support are placed on top of them.
Roof jacks are typically used with shingled roofs, but they can also be used with metal roofing. The sturdiness of the roofing material plays a role, and so it should be considered when installing for stable and safe use of the roofing jacks.
What are the Different Types of Roof Jacks?
The types of roof jacks depend on the slope of the roof to be worked on. The roof jacks can either be a 45-degree, a 60-degree, a 90-degree roof jack, or the slate roof bracket type.
If you do not know the slope of your roof, you can check out this article which describes 5 easy ways to measure the slope of your roof.
The 45-degree roof jack is suitable for a roof slope of 3/12 to 6/12, while the 60-degree roof jack can be used for 6/12 to 16/12 slopes. The 90-degree roof jack is ideal for 10/12 and above roof slopes, while slate roof brackets are suitable for 33-to-55-degree angle slopes.
The 45-degree roof jacks are usually for roofs with gentle slopes. It is an adjustable type that has four holes for adjustment and is made of high-grade steel, which is excellent for weight support. The 60-degree roof jacks, on the other hand, are made from ¼ inch steel. They would need 16d nails to be secured firmly on roofs.
Next are the 90-degree roof jacks, which are great for highly steep roofs and are adjustable for up to 3 slots. As the name suggests, they can support 2 x 6 boards at a 90-degree angle.
Last but not least are the slate roof brackets used with 2 x 12 planks.
The number of roof jacks per plank will depend on the degree as well. 45-to-50-degree angled roofs require about three roof jacks going upward, and they should be spaced out by at least 2 feet. Space them too far apart, and you will risk falling due to stretching out.
Adjustable Roof Bracket vs. Fixed Roof Bracket
Roofing jacks are also called roofing brackets, and you can find them either adjustable or fixed.
As the names suggest, fixed roof brackets have angles that are set to them when bought, while the adjustable roof brackets’ angles can be adjusted according to the slope of the roof.
Make sure to ask or see the descriptions of the slopes they can be used for because not all adjustable roof brackets can be used for all slopes.
Metal Roof Bracket vs. Wood Roof Bracket
Talking about the material, roofing jacks are available in metal (steel) or in wood and steel combinations, although steel is the most commonly used.
They have the same purpose and limitations, while the wood and steel combination are available as adjustable.
When it comes to the safekeeping of these brackets, it will vary depending on the material of your choice.
How Do You Install a Roof Jack?
After determining which type of roof jack you should use depending on the slope, adjustability, and material, it is time to install them on your roof. The installation is an easy process. The jacks are temporarily installed because you will be able to remove them after the roof has been finished.
If you are not comfortable being on a roof, then I would not recommend installing roof jacks yourself. Instead, you should check out Home Advisor. I like them because you can use them to get 3 free estimates from top-rated roofing professionals. This allows you to compare prices to make sure you are getting the best deal.
Roof jacks can be installed both on shingled roofs and metal roofs, and the processes are fairly similar. Below are the steps to install them on shingled roofing:
Step 1: Search for the nearest rafter line.
Use a ladder to climb the roof. You are going to need to locate the rafters or trusses. What I do is, hit the wood decking with my roofing hatchet. When you hit above the truss it will make a different sound from the other spots on the roof. This is how you can locate it. You can also hammer in shingle nails to locate the truss. The nails will feel different when they hit a truss, you may have to hit harder for them to go in. This is another way to help you locate the truss.
Step 2: Nail in the Roof Jack
Normally, when you are installing roof jacks, it is because you have torn off the roof, added the felt underlayments, and are preparing to shingle. If this is the case, then you simply use 16d nails and put 2-4 nails in the trusses.
When you are first starting out with shingles it is best to put down 3-4 rows of shingles first before adding the roofing jacks.
This will prevent the jacks from hitting the gutters or dangling off the edge of the roof which is dangerous.
It is easier if you start by nailing one nail in on the truss without the jack. But do not hit it all the way in. This will act as a guide for the other nails. You can then put the jack on the first nail, which in turn lines up the other nail holes to be on the truss.
If you already have some shingles on, then you will want to make sure that the nails you put in are above the nail line. This will prevent leaks and visible nails from being exposed because they will be covered by the next shingle row.
Step 3: Align the next jack on the next rafter.
The roof jacks should be aligned between 6 to 8 feet apart to prevent the boards from bending. The point of using roofing jacks for platforms is to have a flat, stable surface you can walk on. Nail the boards through the holes on the J-curve side of the roofing jack to better secure the boards to the jack.
I must confess I have not always nailed the boards to the jack, you can sometimes get away without doing it. But it makes it more dangerous because if you step on one of the outer ends of the wood it can cause the other end to come up and make the board fall off the roof. Which would cause you to fall if you are not using a safety harness.
Removing Roof Jacks
To remove the jacks after use, disengage the jacks from the nails by hitting them up with a hammer. The nail holes on the roofing jack are angled so that when you hit it up, it will release the jack.
Sometimes you may have to get in some pretty good hits on them in order to release the jack. Especially if you used a lot of 16D nails. This is why I only recommend 2-4 nails per jack. Any more than that and they will become harder to get off.
If you installed the jacks properly the nails should be covered by the top shingle. This makes it so the nail holes are protected and will not be a source of leaks. Sometimes the nails make poke up a bit, if you notice this, carefully hit the nails down so the shingles will be flat.
Precautions to Take Note Of
Don’t use roofing nails for roof jacks.
You shouldn’t use roofing nails when installing roof jacks for three reasons: their height, diameter, and heads. 3-inch nails are used to hold the roof jack, but roofing nails are shorter than this. Secondly, the small diameter of roofing nails may not hold enough to support the roofer’s weight. Lastly, the roofing nails have light heads, I have often seen the tops of the roofing nails break off. This makes them terrible for use on a roofing jack.
Take note of the weather during installation.
Avoid installing roof jacks during poor weather conditions. If it is raining outside, you not only risk lightning but the wet roofs can add the hazard of slipping when you are standing on the roof. In good weather, wearing rubber-sole shoes can help maintain your foot firmly on the platform.
Don’t use weak boards or boards that split.
2 x 6 and 2 x 10 planks are suitable to be used with roof jacks. Avoid using weak ones and those that are split or cracked because it could make them more prone to breaking while you are on it. Also, avoid using boards that are too long because long and heavy boards may be unsafe for steep roofs.
Don’t drop roof jacks from the roof when done.
After use, it is better not to drop the roof jacks from high places because this could damage the bracket. I have done this before and have bent a few jacks because of it.
How Do You Install a Metal Roof Jack?
You do not always need to install roof jacks with asphalt roofing, especially on gentle slopes but one of the challenges that come with metal roofs is that they are slippery and so you will need likely need to install them if you are going to be working with metal roofs. Similar precautions apply to roof jacks for metal roofs. The difference is you get to use different metal roof brackets to attach the planks for you to step on. There are different kinds of metal brackets for you to choose from if you have a metal roof to work on.
How Much is a Roof Jack?
The cost of a roof jack depends on the type and brand, but it can generally cost you around $10 to $40. The overall cost will vary depending on how many roof jacks you will need as well since the number depends on the steepness and work area.
Precautions When Purchasing Roofing Jacks
Roofing jacks are widely available to be purchased but it is always better to be sure of what you purchasing, especially since it is a tool involving your safety. You will want to check the following when making your purchase:
- The size of the platforms they can cater to
- The slope of the roof they can be used with
- The durability of the material
- Material compliance with safety regulations
Do You Need a Roofing Jack?

The benefits of using roofing jacks are apparent but should you be the one to use them if you are not a roofer? Roofing construction is always best left to roofing professionals because it is dangerous work.
They will be able to install the roofing jacks or brackets properly, making them safer to be used and stood on. They would also have the additional materials needed in partnership with roofing jacks, such as ladders and nails.
Because of the risks that come with roofing, it’s always better to call a professional to do the work. Purchasing and using roofing jacks will do you no good if they are not properly secured and could even pose more danger due to the illusion of safety.
Related Questions
Are roof jacks safe? Roofing jacks provide additional safety when working on roofs since they could be dangerous due to their steepness. However, this is only possible if the roof jacks are installed properly and proper precautions are taken note of and followed. Roof jacks with wrong nails and split or cracked wood boards could pose hazards.
Can you install roof jacks on an existing roof? Yes, roof jacks are typically used for roofing with asphalt shingles but can also be used on metal roofs. They can be installed easily but can also be removed easily after use. Although they can be used with applying new roofing, they can also be used when doing other roofing construction on existing roofs.
How to use roof jacks? After the installation of roofing jacks with proper nails and wood board, they serve as the platform you can step on when working on the roof. Cover the working area with the number of roof jacks and planks needed but remove them after use. Do not drop the materials after use as these could bend and break them.